The Electa Live Moodle Activity Module is a standard Moodle plugin used for scheduling Electa Live events and live sessions in your Moodle courses. Your Moodle users will be able to attend live sessions directly from their Moodle student accounts.
Download the Correct Plugin
Visit our Moodle Plugin download page and get the correct plugin for your Moodle site. Follow the installation steps below to set up the plug in.
Installation of the Activity Module
Electa Live Moodle Activity Module is a standard activity module and its installation does not differ from the installation any other Moodle activity module.
- Download the proper installation package from above
- Then copy the entire directory named "electalive" into Moodle's "mod" folder.
- Log into Moodle as an administrator and click on Notifications and follow the guides to complete the installation
For more information please refer to Moodle support website.
Configuration
After the installation is completed please configure the activity module to work with your Electa Live account as explained below.
1. Click on Modules / Activities / Manage Activities and find then Electa Live Session activity. Click on Settings to configure the settings of the activity module.
2. On the new page specify the following values:
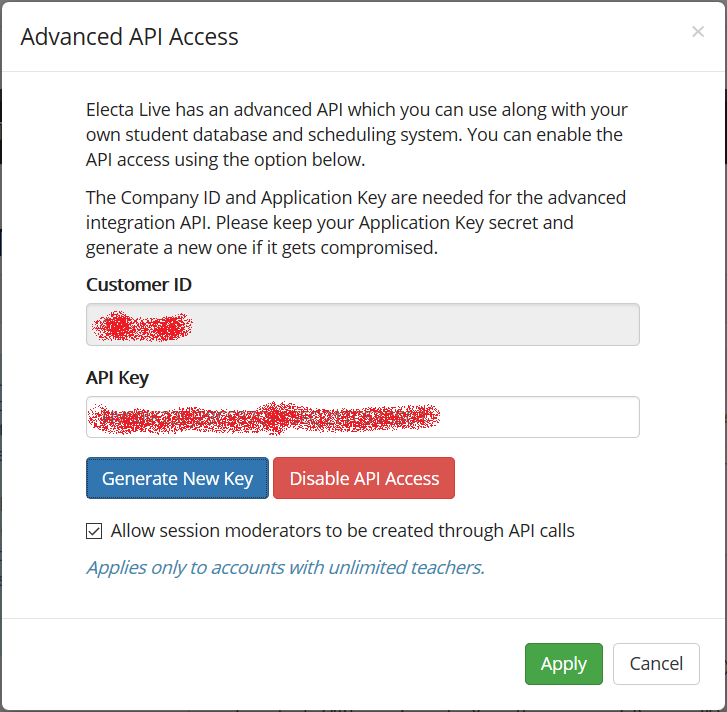
Electa Live Account ID - Your Electa Live customer number - You can get the account # from your Electa Live LMS Admin area as follows:
Click on Account Settings -> HTML Integration & API -> API Access.
Electa Live Site (Domain) - Specify www.e-lectazone.com. Do not use http:// as a prefix
Electa Live Application Key - the customer security code set in your Electa Live profile. You can generate a security Application Key from your Electa Live LMS Admin area as follows:
Click on Account Settings -> HTML Integration & API -> API Access. Copy the value in the API Key field.
If empty click Generate New Key and click Apply. Then use the newly generated key.

Please remember that each time you change the API Key in Electa Live you also have to change this code in Moodle so that it matches the new one.
Finally click "Save changes" in Moodle to apply the settings.
How to schedule Live Session in Moodle
The below video shows how to schedule live sessions in Moodle as a part of your Moodle course activities.
Optionally provide private feedback to help us improve this article...
Thank you for your feedback!